How to use Salt & Temper
The demo is two steps on one recipe. First you verify what a dish actually contains. Then you reshape it to your targets and let the engine rewrite the method to match. Here is the whole flow, screen by screen.
Want to follow along? The home page loads with an example roast-chicken dinner already in the box, so you can run both steps without typing anything.
Verify the macros
Paste a whole recipe into the box, instructions and all. We read out just the ingredient lines, so a title, the method steps, and any notes are fine to leave in. The servings box fills in on its own from the recipe's stated yield, or, when none is given, from an estimate the engine backs out of the total calories. You can type your own count any time to re-portion everything live.
Press Get verified macros. Each ingredient is matched to a food in USDA FoodData Central, your amounts are converted to grams, and the macros are summed by code. What comes back is a per-serving panel and a line-by-line breakdown.
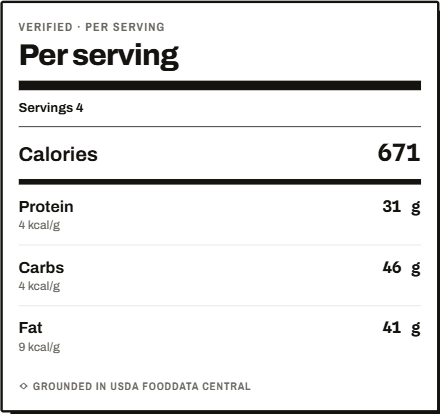
The breakdown is where you check our work. For each line you can see:
- The matched USDA food, the grams we converted it to, and the calories it contributed.
- A closest match label when the food we found is a reasonable proxy rather than an exact hit. When more than one food fit, the engine picks the nearest; open adjust (below) to check or change it.
- An estimated label on a specialty food USDA has no entry for, like manchego or gochujang. We use a documented, hand-curated value rather than guess a number; it is counted, and you can override it with your own label.
- A not counted note on no-quantity seasonings like salt and pepper to taste, which carry no meaningful macros.
- A dry or cooked? prompt on an ingredient that could be either, like polenta, where the two forms differ several-fold in calories and weight. We ask which you mean and leave the line out of the total until you pick, rather than guess.
- A which cut? or raw or cooked? note on a line where the same food comes in variants that count very differently, like a lean versus a fattier trim of the same beef cut, or a raw versus a cooked weight. We count the more common one, show you the difference, and offer one click to switch to the other if that is what you meant.
- An adjust control on each line, in one quiet place. Open it to see the other USDA foods we considered (with their per-100g macros) and swap in a better one, or to see the exact macros we computed for the line, prefilled and editable. If your brand differs from the USDA match, change any value to use your own and recompute;reset to our macros puts ours back, and lines you do not touch stay grounded in USDA data. For a line we could not match, the same control lets you supply the numbers by hand, two ways: enter the total the line adds as written, or switch tofrom a nutrition label and copy the label's per-serving macros plus its serving size. We scale label macros to the amount in your recipe and keep them scaled if you resize it. The scaling never crosses kinds of measure: if your label serving is in grams but the recipe line is in tablespoons, we say so and ask for the as-written total instead of guessing a density.
A Show amounts control above the breakdown (and beside every Step 2 result) displays the recipe in US or metric measures, with oven temperatures to match: kitchen-friendly numbers like 250 ml for a cup, not 236.59. It changes only what you read, never the macros, and amounts we cannot honestly convert (a pinch, a clove, a can) stay as written. Signed-in members can set a default in Account preferences; As written always brings back the original.
When a match is not confident, we leave it out of the total and say so rather than quietly reporting a number we cannot defend. That is the point of Step 1: the headline macros are ones you can stand behind.
Re-engineer to your target
Step 2 works on the same recipe. Start by picking a nutrition lifestyle, or skip straight to the numbers. A lifestyle sets a starting macro split, tailors the kind of swaps the engine will make, and locks the macro that defines it: Low-Carb/Keto locks carbs, Ketovore locks protein and fat, High protein locks protein, and Mediterranean locks fat because the olive oil is the point. High fiber, Balanced, and Original lock nothing, on purpose: High fiber steers which ingredients carry the macros rather than chasing a number, and for the other two no single number outranks the others. Each one has a short explainer behind the info icon, and a full write-up of how we interpret it.
The four boxes are your per-serving target: calories, protein, fat, and carbs. They seed from what Step 1 measured, so you are nudging real numbers, not starting from zero. There are optional dietary styles (gluten-free, vegetarian, vegan) that act as a hard constraint on every swap, plus boxes to list ingredients to avoid and notes for the chef. A Carb counting toggle scores the carb target as net carbs (total minus fiber, how keto and low-carb are usually defined) or, left off, as total carbs, which is stricter.
What a lock actually does. Every macro is a goal; a locked macro is a requirement. The engine must land a locked macro inside your tolerance, trading off the unlocked ones to do it, and if it cannot, it says so rather than quietly missing. Use the small lock beside a macro to set one yourself, on top of or instead of what a lifestyle chose. You can lock at most two: every lock spends some of the recipe's room to maneuver, and two still leaves the engine a free dimension to work with.
Locks also decide how a hard target is judged. With locks set, a dish that holds the locked macros but cannot quite reach the rest is reported as on target where it counts, with the missed numbers flagged. With nothing locked, there is no "where it counts": either all four land inside tolerance or you get the honest closest result. So if one stubborn macro keeps a fatty or starchy dish from converging, lock the one or two numbers you actually care about and let the engine trade the rest.
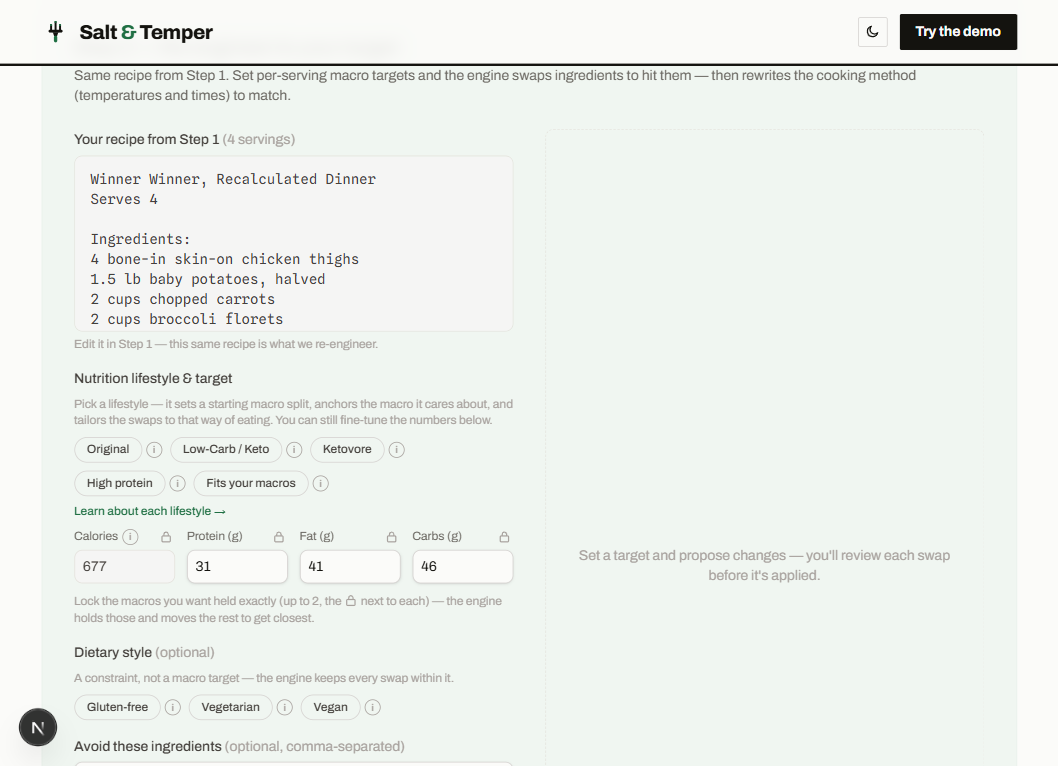
Press Propose changes. The engine proposes ingredient swaps, then recomputes the real macros of its own proposal and shows you a Was, Proposed, and Target comparison so you can see exactly where it landed before anything is applied.
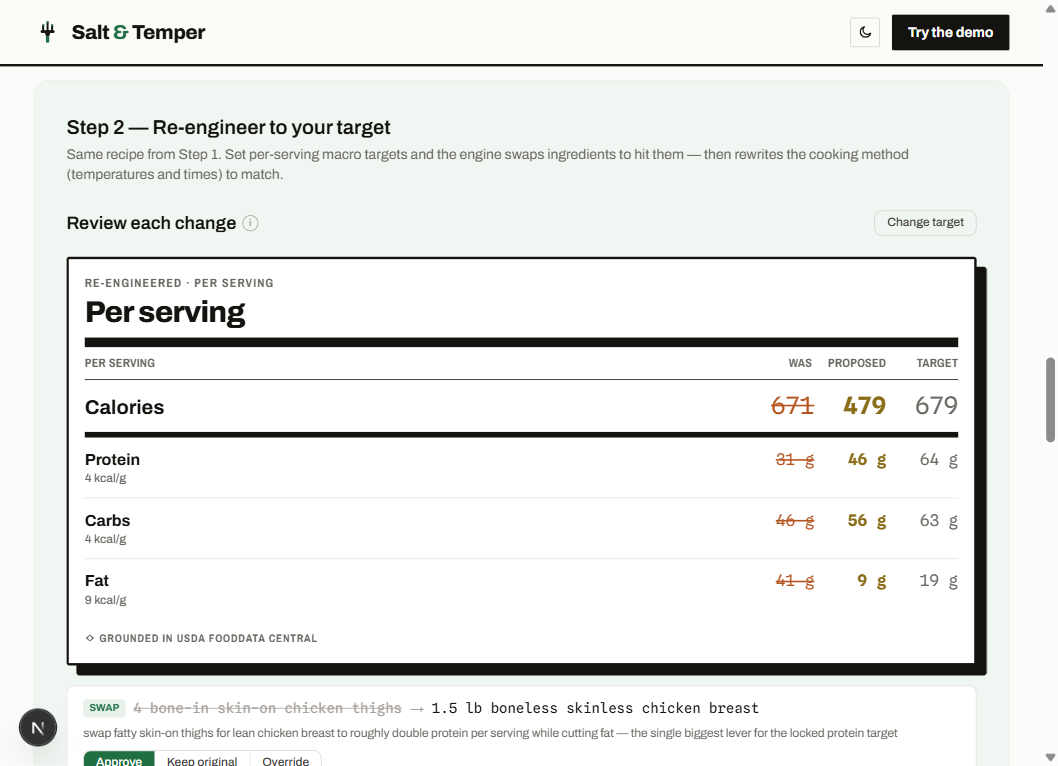
Nothing is committed until you say so. Each line is a swap, an add, a removal, or a keep, with the engine's reasoning underneath. Approve the ones you like, keep your original where you would rather, or override with your own wording. Then commit with Apply as-is, or Apply & close the gap to let the engine run another pass toward the locked targets.
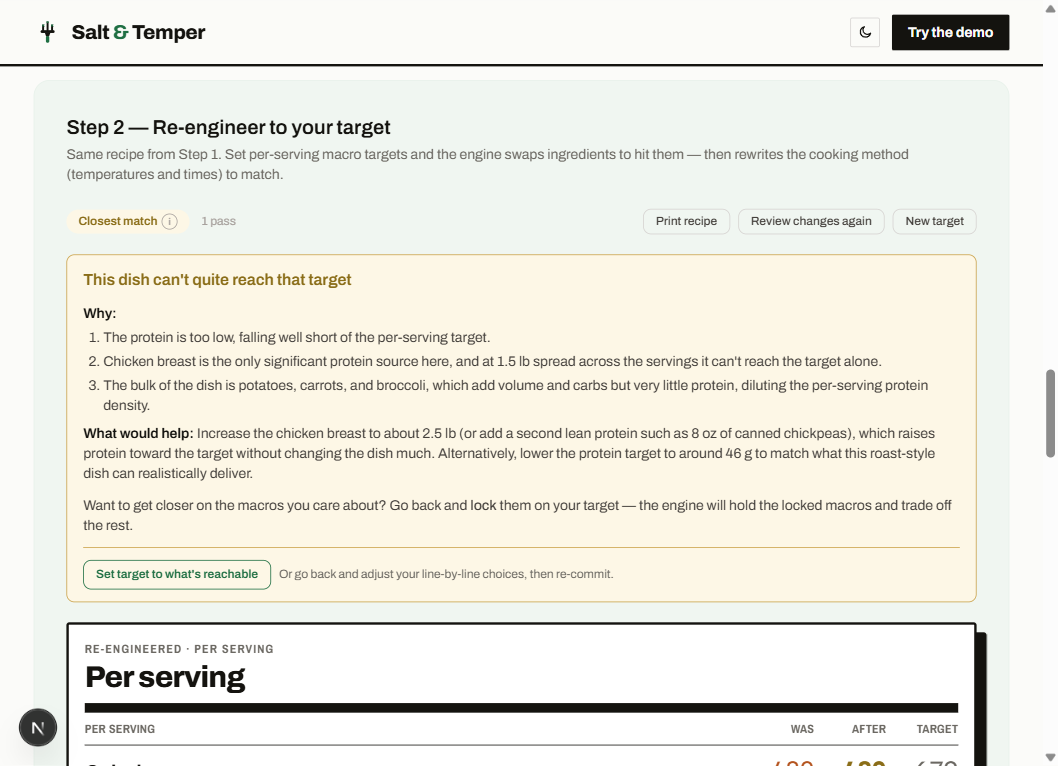
The final result is grounded the same way Step 1 is. When the dish lands inside your tolerance, you get a clear within-target panel. When a target is not reachable while keeping the dish coherent, we do not fudge it. We show the closest honest result and explain why, with a concrete suggestion and a one-click button to set your target to what is actually reachable. And when every version the engine tried missed the same macro the same way, it says so plainly: that dish cannot hit that target without becoming something else, so the fix is changing the base recipe or easing the target, not another attempt.
The re-engineered recipe comes with its cooking method rewritten to match the new ingredients, including adjusted temperatures and times. You can scale the result to any number of servings and print a clean copy to cook from. If you commit a second version and preferred the last one, Back to previous result brings it back exactly as it was.
A few things worth knowing
- Macros are estimates for general information, not medical or dietary advice, and ingredient swaps are suggestions, not allergen-safety guarantees. Always check ingredients against your own needs.
- The demo is free and rate-limited. If you hit a limit, wait a bit and try again.
- Editing the recipe text or the servings in Step 1 carries straight through to Step 2, since both steps work on the same dish.
Macros are estimates for general information only, not medical or dietary advice.